

How To Repair A Leaking Water Shut Off Valve
Dealing with a water leak in your home tin be ane of the scariest things to manage, but information technology becomes much easier to handle with the right noesis. This agreement extends even to dealing with water mains, which are a notoriously challenging project to undertake. All the same, we are here to educate and help make this task less frightening for homeowners!
Fixing a water main shutoff valve leak starts with determining the cause of the leak. Close off the primary water access from the curb if your urban center uses that type of admission point. And so, begin taking apart and cleaning the mineral deposits from your valve. Finally, use a packing string to seal that valve more effectively.
There is a lot more that goes into the cleaning and repairing process. If y'all prefer a visual medium, check out our YouTube video on the subject. If you prefer a written explanation, continue reading to learn all the ins and outs of repairing a h2o main shutoff valve leak.
Tin can A Water Shutoff Valve Be Repaired?
Right out the gate, if yous are unfamiliar with plumbing, any kind of leak tin can feel overwhelming. However, even a leak at your principal water shutoff valve tin can be repaired with a bit of endeavor and know-how. A large part of fixing the h2o main shutoff valve is restricting the water menstruum to that point in your plumbing while you exercise your maintenance.
You can attain this past turning off the water main coming into your house which is usually located nearly the street adjourn. If you lot aren't familiar with this practice, check out our YouTube video! Once you've learned how to shut off your water main admission from the roadside valve, you're fix to begin the repairs on your in-house water principal valve.
How To Set up A Main Water Shutoff Valve
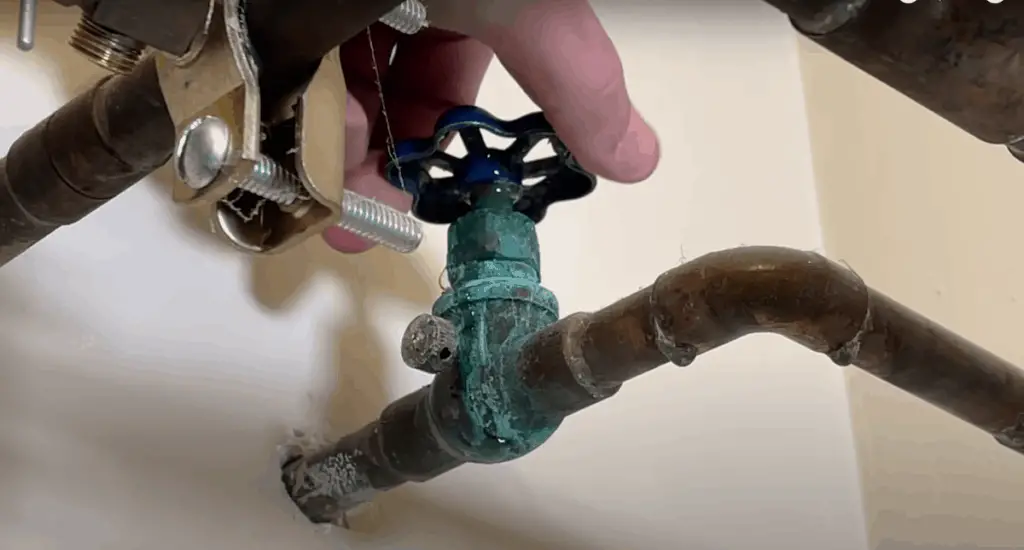
I of the more than common reasons for a leaky water main valve is the bodily blueprint. If the water principal shutoff valve in your dwelling house is one of the kinds that features a cycle handle that you have to turn multiple times to touch on the flow of h2o, then it is connected to a device called a globe or gate valve. A globe valve is very common in older homes and the one that this repair guide volition be focused on.
There are a few potential solutions to a leak with this kind of valve, and we volition become over them in club from simplest to most complicated. Throughout this guide, go along in heed to exist careful when applying torque to your valve'south various fittings. You can easily wind up breaking your plumbing system with accidental excessive strength, so use caution and agree the piping in a house grip while you make adjustments.
Method 1
The beginning step you accept in the troubleshooting process is an attempt to tighten the packing nut. The packing nut is the nut located straight underneath the handle. When y'all look at it, you will hopefully see some threading underneath it, which indicates that there is room to tighten it slightly.
When you tighten the nut you will be compressing the seal or packing material agains the vavle housing and valve stem. Take your crescent wrench, adjust it to the size, and effort to make a quarter-turn clockwise, looking at it from the summit-down perspective.
I usually leave the water on during this process so I can actively see if the leak stops during the tightening of the packing nut. If you take any additional infinite to work with, the valve will tighten, and the leak will stop. If so, congratulations, you're all done! However, if you lot try to tighten the packing nut only it is just at the end of its travel distance already or the leak will non cease and so move on to the next possible solution.
Method two
So if simply tightening the packing nut does not work, the next step in this process is to use Teflon or graphite cord and "pack" underneath the packing nut. Commencement by using your screwdriver to try to remove the handle attached to the valve stem.
In one case the screw is out you might need to work the handle from side to side to loosen information technology from the valve stem. At this point, the water can still be on at the curb just you would want to brand sure y'all have quick access to plough the water valve off at the curb if a large leak starts during this process.
Next, utilize your crescent wrench to unscrew the packing nut entirely, and check to see if there is any remaining packing fabric within of it. At this indicate, you volition want to use either a vinegar soak or, in my case, plumbing sandpaper to remove the excess mineral deposits or packing materials in at that place. This will ensure you start with a fresh and clean fitting. It is besides very important that your valve stem is free of mineral deposits and smooth to the affect.
So wrap your packing string around the stem two or 3 times, and snip the excess. Adjacent, identify the packing nut back onto the stem and tighten it to create a full seal. You lot should notice that the packing nut won't get all the style downwardly to the bottom of the thread, which is ideal. Y'all desire in that location to be a bit of space. If it goes too far down, add another layer or two of the packing cloth and try again.
Exercise you still take a leak? If so, information technology'southward time to move on to the terminal solution.
Method 3
The final method essentially involves removing all of the components of the valve and replacing the flat washer at the lesser of the valve stalk. Beginning past shutting off your h2o supply at the curb and removing the packing nut again. Adjacent, unscrew the bonnet nut, which is the larger one underneath the packing nut. Remember, exist cautious equally y'all unscrew this nut as it can exist very stiff with mineral deposits.
Once you've removed the bonnet nut, you should see the flat washer and seal that actually restricts water flow inside the globe valve. You will want to take the valve stalk with seal downward to your local hardware shop and accept them aid you lot source a replacement. Nosotros recommend soaking all of your valve components in vinegar or CLR (Calcium, Lime, Rust) liquid cleaner, to remove all the excess mineral deposits.
Once you take your new flat washer in paw, you lot can reassemble the valve and test your water supply to see if the leak is solved. At this signal, you should find that in that location is no leakage whatsoever, and your in-house water main should be useful once again. If you still are having trouble or intend to better your plumbing system, we recommend installing a ball valve as these types of valves require far less maintenance and are less decumbent to failure.
The Wrap Up
Isn't information technology simple to prepare in one case you sympathize what the process is? If you can handle fixing a plumbing issue at your dwelling house's chief water source, you should exist able to tackle annihilation from now on. If you demand aid with any other home maintenance or repair processes, check out our YouTube aqueduct for more videos on helping others with their everyday domicile repairs.
Source: https://everydayhomerepairs.com/how-to-fix-a-water-main-shutoff-valve-leak/
0 Response to "How To Repair A Leaking Water Shut Off Valve"
Post a Comment